| Sponsors |
|---|
Missing My Mummy Quest Guide
Difficulty: IntermediateLength: Medium
Members only: Yes
Reward:
- 1 quest point
- 5,000 Coins
- 7,000 Constitution Xp
- 2,100 Construction Xp
- 2,100 Cooking Xp
- 6,500 Prayer Xp
- 5,000 Magic Xp
- 3,350 Crafting Xp
Start:
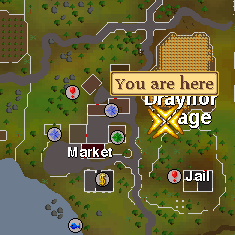
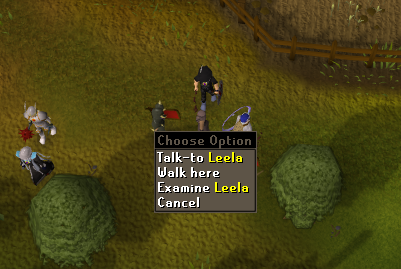
Talk to Leela North East of Draynor Bank
Needed skills:
- 35 Cooking
- 35 Construction
- 35 Crafting
- 35 Magic
- 35 Prayer
- Ability to kill 5 level-64 creatures
Needed quests:
Needed items:
- Knife
- Hammer
- Saw
- Chisel
- Jug of Wine
- Spice (gnome spice will not work, put into wine)
- Empty pot
- Grain (put into pot)
- 20 Fire runes
- 2 Shanty pass
- Prayer potion
- Willow Log
- 400 coins
- 3 Teleports
Walkthrough
Intro:
There are many secrets hidden in the depths of the desert. Forgotten tombs of forgotten rulers from a forgotten time, when the world was a very different place...or at least they were forgotten. The spread of human civilization, however, means that many of the hidden corners of the world are being uncovered, often by treasure-hunters with little regard for preserving the sanctity of these ancient places.
Recently, one such tomb, near Uzer, was discovered by treasure-hunters. Leela of Al Kharid does care about the sanctity of this particular place, and she wants your help to recover information that is of great importance to her.
Start:
Talk to Leela, slightly North East of the Draynor Market Bank.
Leela will express her thanks for past help you have done and offer you a new quest. Upon accepting her request for help, she will discuss what she will need you to do. She tells you that you must go to the ancient pyramid South of Uzer to find information for her. In the process of the conversation she says you must talk with the inhabitants there, the only inhabitant being the Mummy Queen. She hastily sends you on your way.
Getting Underway:
Items Needed: Shanty Pass, 200gp, A Falador Teleport.
Suggested Items: Armour, Enchanted Water Tiara or a full Water skin, Lightweight Clothes
Make your way to Al Kharid using an Amulet of Glory or simply walk. After making sure you have all the required and suggested items, you are ready to begin.
After going through the Shanty Pass, Take the traveling rug to Uzer for 200 gp (remember, you’ll need your right hand free for this).
From Uzer, head south until you find yourself at a Pyramid of sorts, Go ahead and enter whenever you are ready.
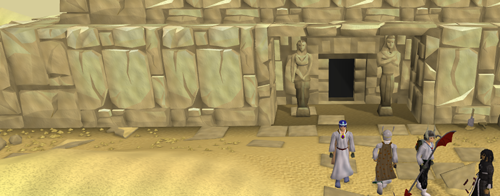
Once you are inside the pyramid, there will be three passageways that you find.
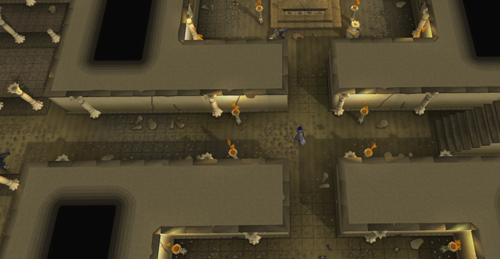
To the West, you will find a broken library, it is of no use.
To the East you will find a golem on the floor of the tunnel, he does not have much to say.
Rummage through the skeletons here; they will animate and attack you, kill them for their treasure (they have 40 hp).
Keep the Canopic jars you find from these skeletons.
To the North of the entrance, you will find a large audience hall, again, kill the skeleton here and head to the chamber to the East.
Open the Door and kill the skeletons again, once all of the skeletons are dead, you should find yourself with a mummy hand. Grab this, the plain canopic jar, the journal, and the translated text that you found from the Skeletons and return to Leela for further instructions. Use your teleport to get there.
Leela:
She will be worried about the pyramids desecration and ask you to go back to find out what happened to the mummy. She also mentions that you will have to reconstruct the mummy with the pieces you find.
For this next part, you will need:
A Willow log, Knife, Hammer, Saw, Chisel, Spiced wine, Pot of grain, 20 Fire Runes, a Prayer Potion. some food, and the same things you needed for the previous trip. (Will need the canopic jar and the hand, also 4 more open spaces).
Return to the Pyramid and go back to the last chamber you were in (North then West).
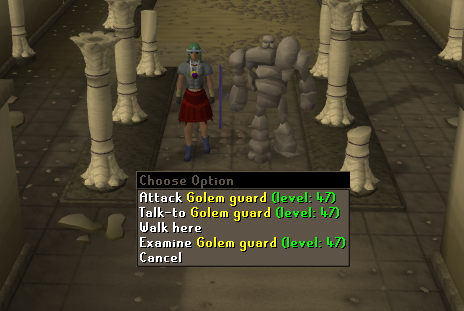
You will have to defeat the Golem that is there, but there is a trick to it. The only weapons that can hurt him are blunt ones; this means no whips or blades of any type. If you have a decent Combat level you can simply punch him out or use a Mace on him.
After beating the Golem, go down the stairs and explore the tunnels there. You will find little scarabs there that will attack you; you can either ignore them or kill them. You will need to find the remaining 3 Canopic jars and the Mummy with no hand.
Upon obtaining the 4 canopic jars and the completed Mummy (use the hand on the mummy), return to the stairs where you entered this level. To the South, you will find this chamber:
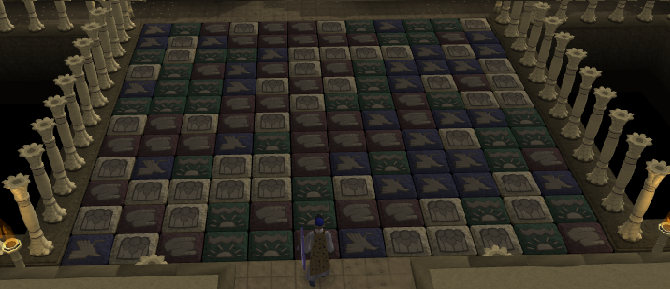
This room is quite tricky and can deal you a substantial amount of damage.
The safest option is to stay on the green and blue squares or to stay on the yellow and red squares. Sometimes this will not be an option and you will take damage (up to 20 each) The more you can stay on the color combination paths, the better.
Blue and Green or Red and Yellow.
As an example, this is a good route to take.
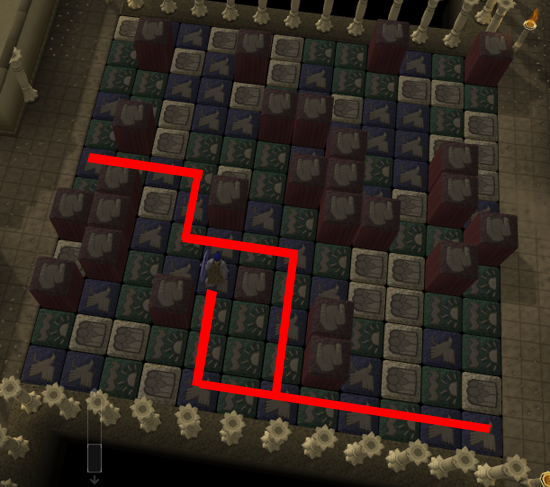
Stepping on blue makes red rise.
Stepping on green makes Yellow Rise.
So do not get blocked in.
It will be different every time you enter the pyramid so there is no concrete path to take.
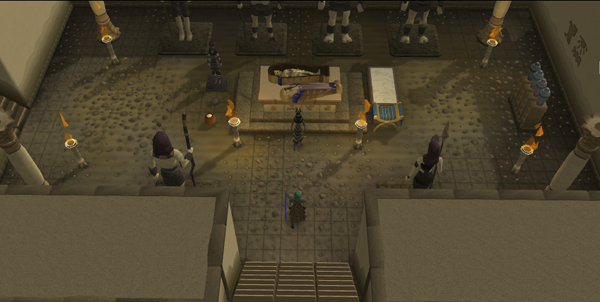
Once you make it past the Puzzle room, go into the Sarcophagus room.
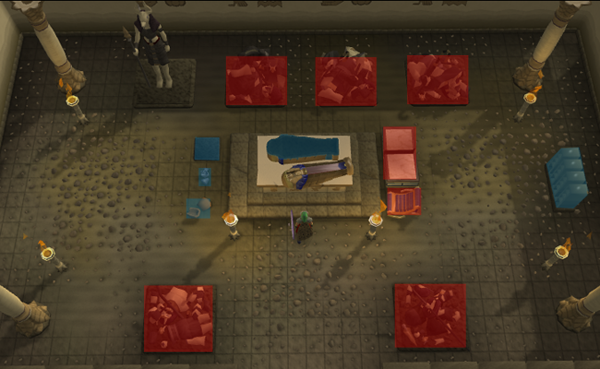
You will need to fix the Red areas and replace the Blue ones.
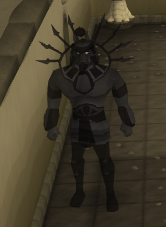
In the Chamber to the East, you will find a Shadow to kill, do so. You will need to do this in order to make the statue.
Here are the tasks:
Place the completed Mummy in the coffin
Fix the chair and the table (2100 Construction XP)
Make a statue, carve it 3 times to get a good likeness (3350 Crafting XP)
Replace the pot of grain and the spices wine (2100 Cooking XP)
Pray at each statue pile to reconstruct them (6500 Prayer XP) You might run out of prayer points at this time, use your prayer pot
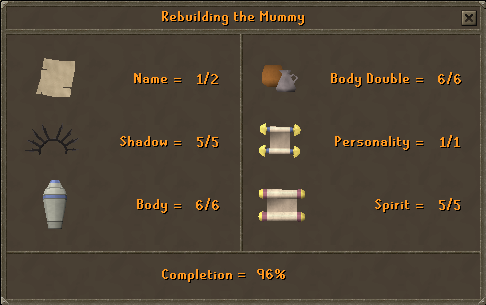
If at anytime you are unsure of is left for you to do, in relation to restoring the Mummy right click either the Pyramid journal or the Scroll of the dead and click "Check progress" then a box will open up and so you what you've got to do.
When you’ve completed, it should look something like this:
Using your Fire runes light the fires torches in the wall, You are only required to light one, but if you have 50 magic, you can light all of them in this order:
First Kill (300 Magic XP)
South (600 Magic XP)
North (900 Magic XP)
West (1200 Magic XP)
East (2000 Magic XP)
Note: you will have to kill a shadow for each of these lights.
If you complete praying to all of the statues to reassemble them, lower levels can use prayer to protect from melee at this point. Upon completion of the statues, players can recharge prayer at any one of the six statues in the sarcophagus room.
Finishing Up:
After completing around 88% of the resurrection you’re free to get out of there.
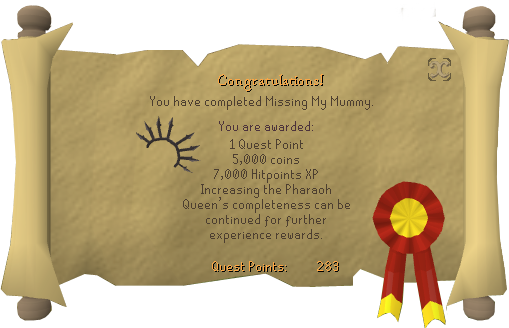
Use your teleport to return to Leela and claim your reward.
Extra Information
You may have noticed that you only got to 88% complete on your resurrection of the queen., there are a few more steps that you need to do to get 100%. There are no rewards for the last stages of this except knowledge.
Requirements to complete:
25 Thieving
45 Crafting
45 Prayer
50 Magic
Garden of Tranquillity
In Al Kharid, you will have to talk to Ali Morrisan and after giving him a squirk juice to obtain the copy of the name scroll (Can be any type of squik juice, Winter, Spring etc). After you have the copy, you can use your ring of charos on him and get the real scroll. (You'll also get the Thieving xp for the squirk juice you use)
Walk to Varrock, along the way, grab an Al Kharid flier from the boy to the north of the mine. In Varrock library, you will need to talk to Reldo. He will request the flier and afterwards give you the last piece of parchment you need to attain 100%.
Return to the Ghost in the pyramid and she will accept them, giving you 100% and you can ask questions about the history of the pyramid and whatnot.
Guide credits
Special thanks: Mckenz1124, Balatis
Last update: 09-Jun-2010 01:35 by Rebel007